Botanical Fabric Dyeing
Most
people that grew up in the sixties would have explored the world of tie
die. Our tie dye t shirts proclaimed to
the world that we were a new generation.
Peace
and Love!
Unfortunately,
that dye was not very environmentally friendly and so I started researching the
world of botanical dyeing.
Fabric choice:
It
turns out that fabric is either cellulose (plant based) or animal based. Cotton and linen come from plants, and silk and
wool come from an animal – the silk worm, or wool of an animal. Animal fabric accepts dye much easier, and so
does not need to be scoured, just washed gently.
Scouring:
In order to open the fibres to ready the cloth for dyeing, it has to be scoured, which means the fabric needs to be boiled in a mixture of washing soda and soap.


Mordant:
This
next step concerned me. A mordant is
required to open up the fabric to receive the dye, most instructions use a
product called alum. Warnings alarmed me
that if you use a pot for this step, you should not use your pot for food
preparation! Whoa! Warning bells ringing! One option, which is not considered a
mordant, but does the same job, and opens up the fabric so that the dye will
bind to the fibres, is to soak the fabric in soy milk for a day. Of course, I
went that route. As I live in the tropics
I kept it in the fridge for a full 24 hours, and then rinsed the fabric. You can dry the fabric at this stage or use
it straight away in the dye pot.
Dye extraction:
I
decided to use natural products to dye with, and funnily enough the kind of
products that you would think would be best do not actually create a long
lasting dye. Turmeric, beetroot
etc. On the other hand, onion skins and
avocado pits and shells came with good recommendations. I decided to use those for my
crafternoons. They needed to be soaked
overnight and then simmered for at least 2 hours. You need at least an equal amount of dye
material as dry weight fabric. Mine was
twice the weight of dye material to fabric, just to be safe. I simmered both
pots for a good hour, and then left to cool before straining. The plant material and used dye can be
composted – I love the circular methods of doing things…..

Dyeing:
When everyone arrived, they each chose two items, and then folded, tied and experimented with rubber bands, string, popsicle sticks etc.

Everyone chose which dye pot they wanted
their item to go into, and then we sat and had afternoon tea while we
waited.
Afternoon tea:
I had
seen a TV show featuring a little country town where lonely older people had
got together and donated all their lovely old tea cups and teapots to the
town. Every fortnight volunteers would
serve afternoon tea to the “oldies”. I
loved that idea and decided to use their scone recipe, with a few tweaks of my
own. Scones with jam and cream are
always a winner in my book!
SCONES
1 egg
1 cup milk
¾ cup
Greek yoghurt
1 tsp
vanilla
60g
chilled butter, grated
500g
plain flour
2 1/2
Tablespoons baking powder
Preheat
oven to 180*C.
Whisk
wet ingredients in a bowl.
Sift dry ingredients into a large bowl, and
gently rub in butter
Add
wet ingredients to dry ingredients and mix lightly into a ball
Transfer
to flour dusted chopping board, and pat into a rectangle. Cut into 12 squares, and place onto a baking
tray, fairly close together.
Bake
for 15 minutes.
Serve
with jam and cream.
The big reveal:
After
we finished our tea I picked up the dyed items with tongs and placed them onto
an old piece of cardboard. As they cooled down, we began to unwrap our
treasures. They can be rinsed at this
stage, or dried and then ironed before rinsing as I find that sets more dye
into into the fabric. Look at them
drying in the shade! Success!

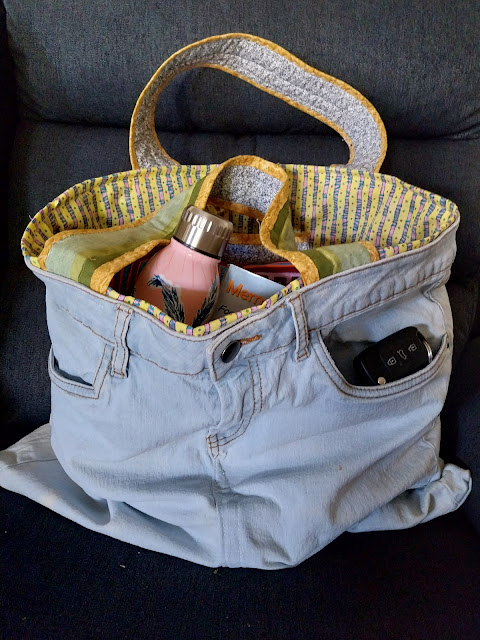
From the left, calico dishcloth and silk scarf dyed in onion skin dye. A selecti on of silk scarves dyed in avocado skin dye. To the right is a calico dishcloth dyed in avocado skin dye.

Onion skin and avocado calico dishcloths.


What a big process however they look great. My daughter had a teacher at her school that only wore bright coloured tie dyed tshirts and she had pink hair. She was her teacher 4 years ago but she would still be out there with her bright happy hair and shirt.
ReplyDeleteIt is so awesome for kids to have mentors that are so comfortable in their own expressions.
DeleteBack in the late 70's, I did a bit of weaving and I did dye some wool with plant dyes I sourced locally. It was lots of fun. We had butternut trees and their nuts make a very permanent brown. I also used onions, horsetails and beets. My sister is now experimenting with natural dyes for screen printing.
ReplyDeleteIt really is quite fun. I didnt try beets, because I read that they turned a mudddy brown, but might try some others now - you cannot always believe everything you read!
ReplyDeleteI have a crocheted collar from the early 1900s that was dyed with beets. It's a very soft shell pink.
DeleteI watched the mum of a friend when a kid, do a lot of dying with eucalyptus leaves and other botanicals. Then as an adult I have had two friends who have loved playing round with what they can dye, including with earth (That was a great result, and the earth from different parts of Australia varies beautifully)
ReplyDeleteBut I've never done any myself. Only with commercial dyes.
I'm eyeing off some true indigo seeds I have, and also the native indigo, though that looks like it probably won't flourish in Darwin, that it needs a cooler climate.
I will definitely dye with indigo if it grows!
I have some Henna plants for the scent, when they're old enough I might look at using those for dying too.
The idea of dying with my own plants appeals the most :-)
Oh that is interesting, if those grow in Darwin, I might be able to grow them here too! I heard that indigo has quite a complicated process of fermenting before you can use it. I love anything circular, where you have a part in every process, so growing the dye I use is super special!
ReplyDeleteI've seen indigo growing wild here. Not sure if it's the classic indigo grown around the tropics, or the native one. And can't recognise it from all the other weeds and natives around the foreshore without my friend to point it out (duh!) and she moved back to Melbourne.
ReplyDeleteBut both would be worth trying where you are, I think.
Also the henna! It's worth it for the scent of the flowers alone. Mmmm! And it grows naturally in a wet-dry tropics from what I gathered from research. I have mine in pots but learning that I;m considering just sticking it in the garden somewhere. And when it's big enough getting the orangey dye and trying to make it so it won't wash out.
The indigo seeds are from ebay. But Henna grows very easily from hardwood or semi-hardwood cuttings. They look like they're a pain to try to germinate, but that might be in a temperate climate.
If you can't find some there and customs would allow I could send you a plant of it! I have a few extras!